Looking for Solar Panels in Midland? Here’s Complete Step-by-step Guide from Middle Swan
Are you a nature lover who wants to switch to
eco-friendly and renewable energy resources? Are you looking for solar panels in Midland that are
affordable, durable, and of good quality? If yes, then congratulations; you
have arrived at the right place as Middle Swan Solar presents before you a complete
solar panel installation Midland guide in a step-by-step process.

Solar panels are used to generate electricity for both
domestic as well as commercial use. Their position should be such that they get
maximum possible sunlight and generate maximum electricity.
Middle Swan Solar- Our Service.
We are one of the most renowned businesses
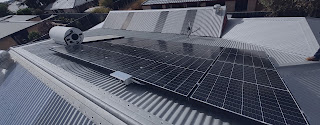
selling solar panels in Midland. These panels are generally installed on rooftops,
building tops, or stand-alone facilities. It is imperative to install solar
panels at a point that receives the most direct sun exposure throughout the
day.
There is a reason for this- solar panels perform at
their best capacity only when placed in direct sunlight. When installing solar
panels, we try to position your photovoltaic panels directly under the sun for
maximum efficiency from the photovoltaic unit.
Types of Solar Panel Mounts
We deal with three kinds of solar panel mounts, viz.
pole mounts, roof-ground mounts, and flush mounts. Using these, you can install
your solar panel onto an RV, on the rooftop, or against the side of a pole, on
your roof.
Step-by-Step Installation Process
- Mounting the Installation: The first step is the installation of mounts to
support the solar panels. These can be roof-ground mounts or flush mounts
as per needs. A lot of focus is given to the direction in which the PV
panels are installed. As the USA lies in the northern hemisphere, the
panels face south to get maximum light. Furthermore, the panels are
slightly titled between 18 to 36 degrees for the purpose.
- Installation of Panel: After mounting the installations, the solar
panels are fixed. They are tightened using nuts and bolts, and it is
ensured that the structure is sturdy and robust.
- Electrical Wiring: MC4 connectors are best for electrical
wiring as they can be connected to all types of solar panels. In this
step, the panels are connected with each other using electric wires.
·
Connecting
to Solar Inverter: After
wiring is done, the system is then connected to a solar inverter. The positive
wire from the solar panel is connected with the Positive terminal of the
inverter, and the Negative wire is connected with the Negative terminal of the
inverter. Furthermore, the solar inverter is then connected with the Solar
Battery and Grid input in order to generate electricity.
·
Connecting
solar inverter with solar battery: In this step, the battery's positive terminal is connected
with the positive terminal of the inverter, and the negative terminal is
connected with the negative terminal of the inverter. Also, a Battery is
installed in an off-grid solar system to store backup electricity.
·
Connecting
solar inverter with the grid: After the solar inverter is connected with the solar
battery, the inverter is connected with the grid. For this, a
standard plug is used to connect to the main power switchboard. After this, an
output wire is connected with an electric board that supplies electricity to
the place.
·
Switch
on inverter: After
all the electrical wiring and connections are made, the inverter switch is
switched on the Main Switch of the house. The solar inverter will have a
digital display to show details about solar electricity generation and its
usage.


Comments
Post a Comment